
近期我部署在Gitee上的博客已经不能用了, 虽然还能上传, 但是已经不会把上传的文章更新出来了, 故迁移到Github上, 顺便Hexo文章生成速度不太理想, 趁着这次部署站点迁移一并切换到Hugo.
搭建Hugo写作环境
Hugo下载
首先从Hugo官网下载适合自己电脑环境的Hugo版本。
下载地址:https://github.com/gohugoio/hugo/releases
将解压出来的Hugo.exe 添加到环境变量中。
创建Github Pages 仓库
进入Github网站,点击New Repositories 按钮,新建一个仓库,名称我这里选blog,访问类型选择Public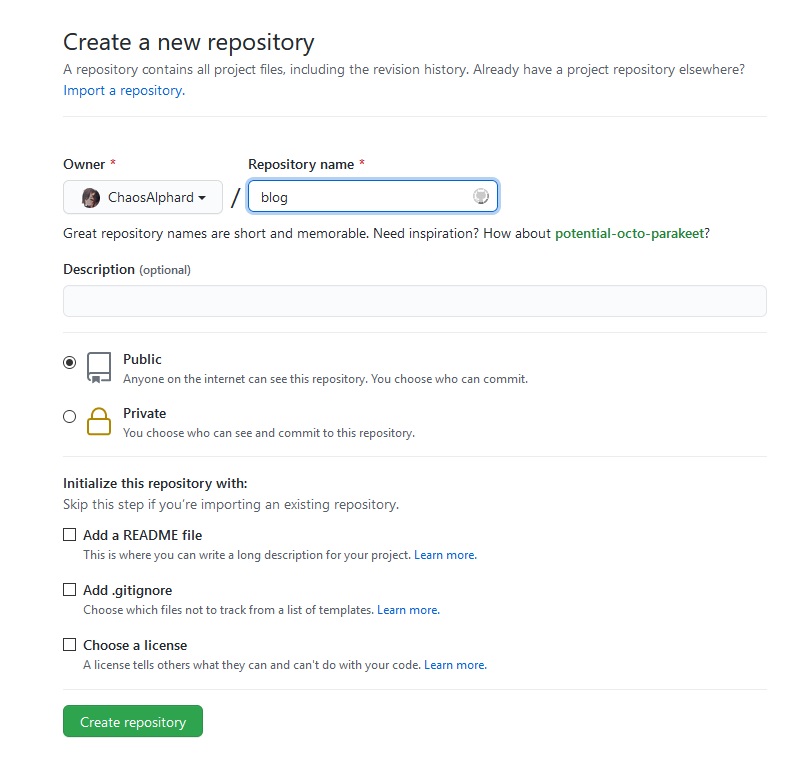
创建完成后点击Settings选项,选择Pages,Branch选择master,目录选择/docs,之后点击save按钮,即可看到上方蓝色提示:Your site is ready to be published at https://chaosalphard.github.io/blog,这个地址便是Github给你分配的博客地址,如果你有自己的域名的话可以在这里绑定。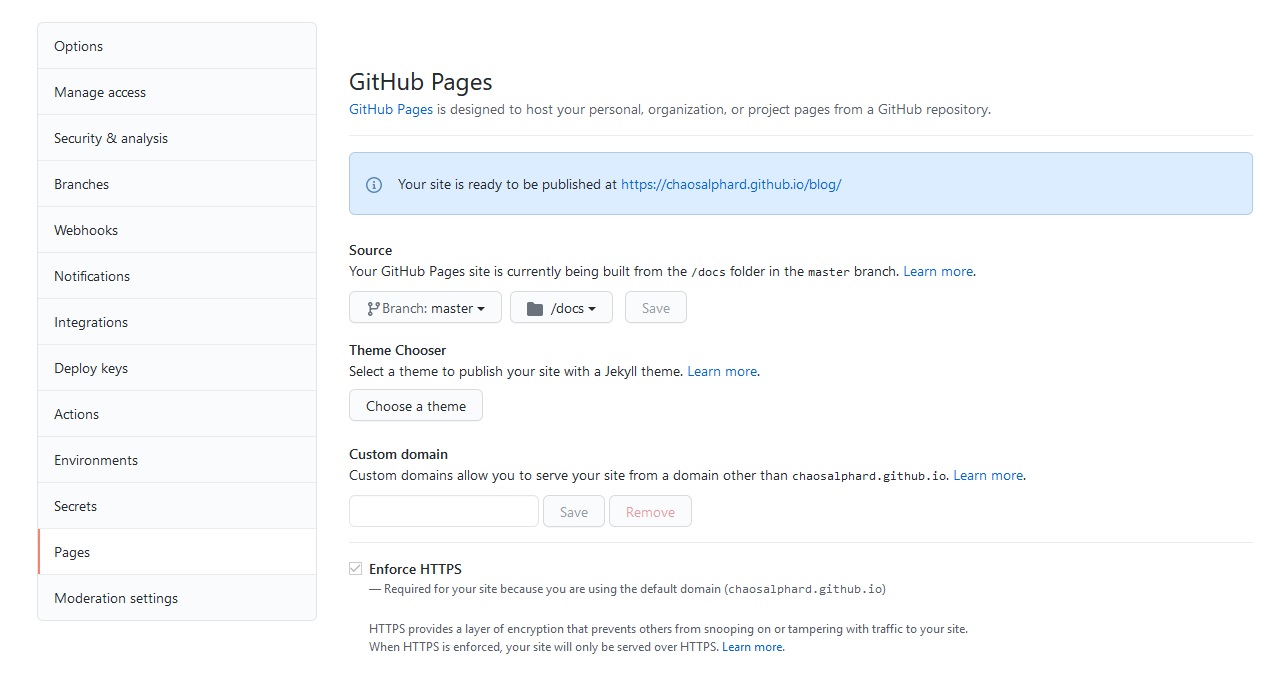
初始化Hugo站点
将刚才创建的Git 仓库Clone 到本地,打开命令行,切换到刚才Clone 下来的仓库的文件夹里面,此时文件夹里面应该除了一个名为.git的隐藏文件夹之外没有其他文件了,执行hugo new site . --force 来初始化hugo站点。
之后选择一款自己喜欢的主题,地址:https://themes.gohugo.io,下载或者Clone 到本地,将文件夹放到hugo站点的根目录下。
编辑config.toml/config.yaml/config.json 配置文件,修改baseurl 为Github 分配的博客地址,修改theme 为你的主题文件夹名称。
创建文章
切换到hugo站点目录,执行hugo new post/article.md 来新建一篇名为article 的文章,文件位于/content/post 目录下,打开文件进行编辑,因为我之前用Hexo的时候已经有一些文章了,所以我直接复制过来,Hexo和Hugo都支持markdown语法编写的文章,所以可以直接切换。
部署到GitHubPages
本地调试
切换到hugo站点目录,执行hugo server -D,此时会输出以下信息
~/Hugo/blog> hugo server -D
Start building sites …
                   | ZH-CN
-------------------+--------
  Pages            |   182
  Paginator pages  |    20
  Non-page files   |     4
  Static files     |     0
  Processed images |    13
  Aliases          |    61
  Sitemaps         |     1
  Cleaned          |     0

Built in 3795 ms
Watching for changes in ~/Hugo/blog/{archetypes,assets,content,data,layouts,static,themes}
Watching for config changes in ~/Hugo/blog/config.yaml
Environment: "development"
Serving pages from memory
Running in Fast Render Mode. For full rebuilds on change: hugo server --disableFastRender
Web Server is available at http://localhost:1313/blog/ (bind address 127.0.0.1)
Press Ctrl+C to stop
根据提示打开网址 (我这里是http://localhost:1313/blog/) 即可看到文章,确认无误后即可部署到GithubPages上。
生成文件并部署到GithubPages上
切换到hugo站点目录下,执行hugo -d docs,即可在/docs 目录下生成部署文件,之后将所有改动从本地提交到远程Git仓库上 (或者仅提交/docs目录下文件也可以)。
配置GithubAction完成云端构建
创建Action配置文件
在hugo站点目录下新建.github/workflows 目录,在此目录下新建gh-pages.yaml 文件并写入以下内容。
# Action名称
name: Deploy Github Pages
on:
  push:
    branches:
      # 在master分支被push时触发
      - master
jobs:
  deploy:
    runs-on: ubuntu-20.04
    # 设置执行环境
    environment:
      name: github-pages
    # 步骤
    steps:
      # 检出
      - name: Checkout Repo
        uses: actions/checkout@v2
        with:
          submodules: true
          fetch-depth: 0
      # 初始化Hugo
      - name: Setup Hugo
        uses: peaceiris/actions-hugo@v2
        with:
          hugo-version: '0.83.1'
          extended: true
      # 生成部署文件
      - name: Build
        run: hugo --gc --minify --cleanDestinationDir
      # 部署到GithubPages
      - name: Deploy
        uses: peaceiris/actions-gh-pages@v3
        with:
          # ACTIONS_DEPLOY_KEY需要在仓库里进行配置
          deploy_key: ${{ secrets.ACTIONS_DEPLOY_KEY }}
          force_orphan: true
          # 设置使用gh-pages分支来存放部署文件, 一般master分支存放原始文件, gh-pages分支存放部署文件
          publish_branch: gh-pages
          # hugo生成的部署文件默认放在public目录中, 这里是指定推送public目录中的文件到gh-pages分支中
          publish_dir: ./public
          # 排除文件不推送到gh-pages分支中
          exclude_assets: '.github'
          user_name: 'github-actions[bot]'
          user_email: 'github-actions[bot]@chaosalphard.noreply.github.com'
          commit_message: ${{ github.event.head_commit.message }}
其他更多设置请查看actions-hugo和actions-gh-pages插件说明
生成部署密钥
执行ssh-keygen -t rsa -b 4096 -C "$(git config user.email)" -f gh-pages -N "" 指令生成一对公钥(gh-pages.pub)和私钥(gh-pages)
进入Github Pages仓库,点击Settings 选项,选择Deploy keys,新建一个Deploy key,将刚才生成的公钥文件的内容复制进来,勾选Allow write access 选项,然后保存。
点击Environments 选项,新建一个Environments 名称填github-pages (需要与gh-pages.yaml 文件中设置的environment name 一致),之后在github-pages 下新建一个secret,名称填ACTIONS_DEPLOY_KEY (需要与gh-pages.yaml 文件中设置的deploy_key 对应),将刚才生成的私钥文件的内容复制过来,然后保存。
测试Action部署
回到Hugo站点目录,将/docs目录删除,因为我们现在不需要在本地生成部署文件了,之后提交到Github Pages仓库,然后去Github Pages仓库的Action 选项,查看任务是否执行成功。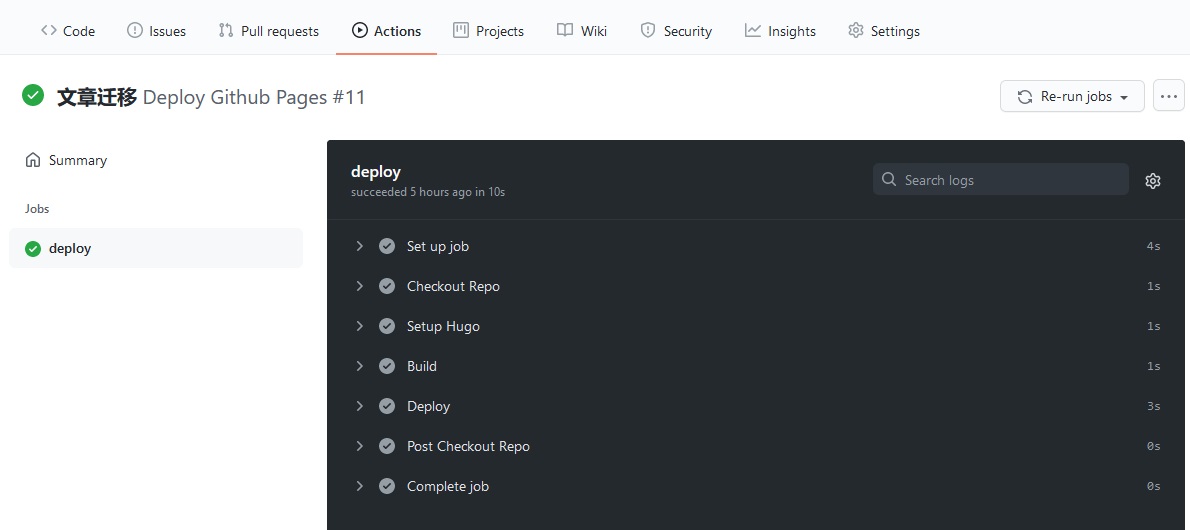
如果没有成功,回到Settings 选项下的Pages 页面,将Branch 更改为gh-pages,目录选择/,保存,然后回到Action 页面,点击Re-run jobs,稍等一会即可看到结果。