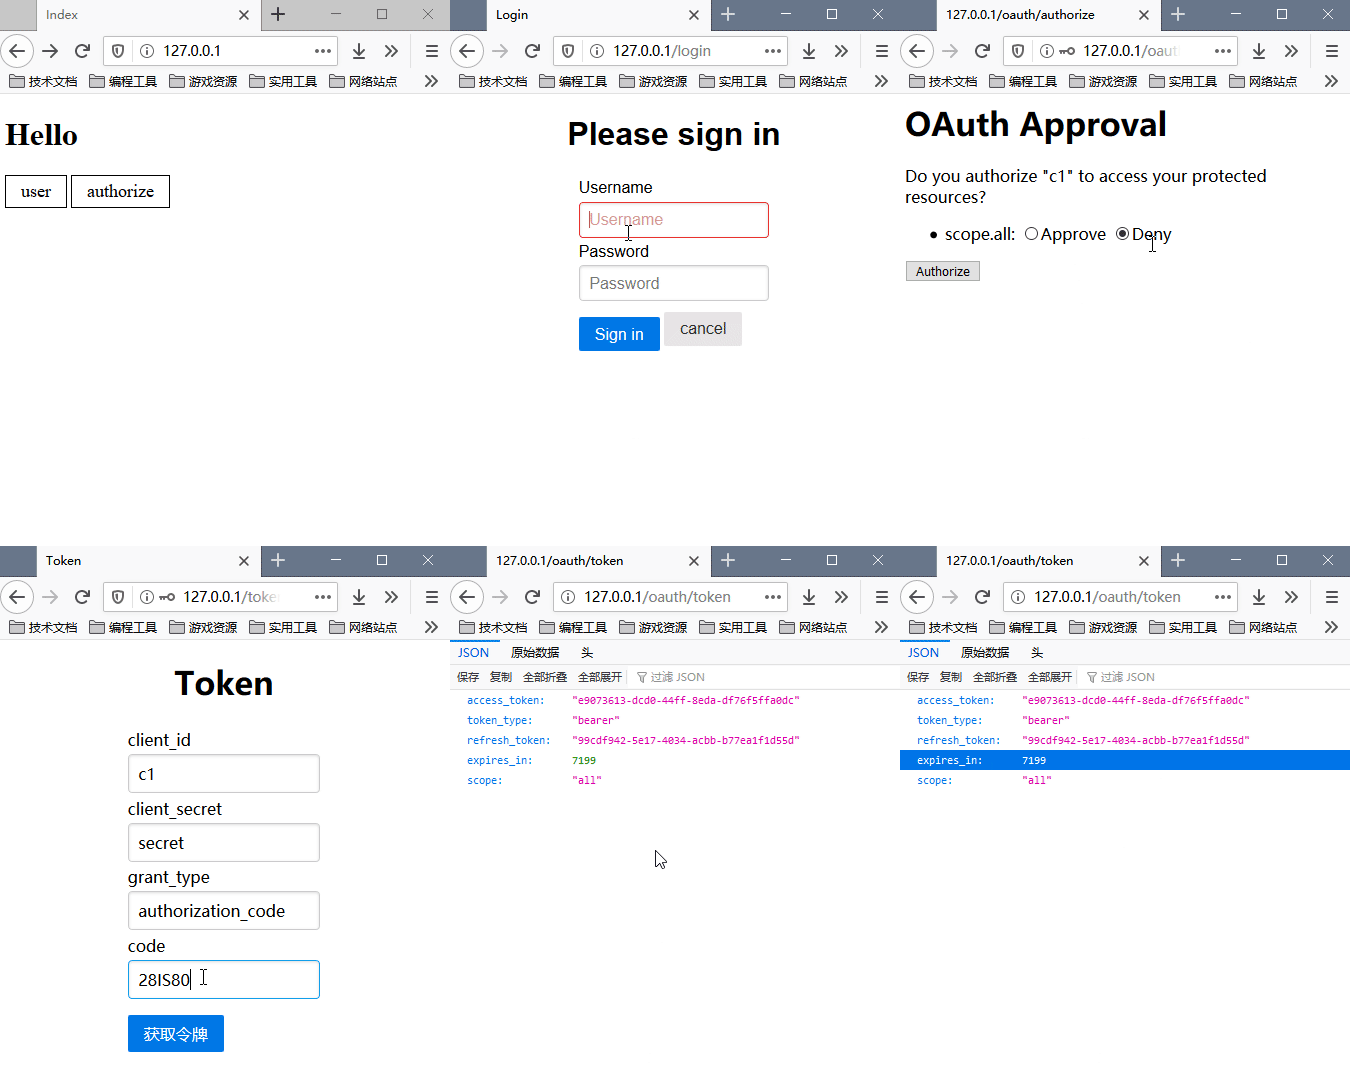
OAuth2.0授权服务器搭建
向pom.xml中添加以下依赖
<dependencies>
  <dependency>
    <groupId>org.springframework.cloud</groupId>
    <artifactId>spring-cloud-starter-security</artifactId>
  </dependency>
  <dependency>
    <groupId>org.springframework.cloud</groupId>
    <artifactId>spring-cloud-starter-oauth2</artifactId>
  </dependency>
</dependencies>
配置client端的详情信息
@Configuration
@EnableAuthorizationServer
public class AuthorizationServerConfig extends AuthorizationServerConfigurerAdapter {
    // 配置客户端详情信息
    @Override
    public void configure(ClientDetailsServiceConfigurer clients) throws Exception {
        clients.inMemory()  // inMemory: 使用内存方式
            // 客户端ID
            .withClient("c1")
            // 客户端密钥, 加密方式需要与SpringSecurity中的方式一致
            .secret(new BCryptPasswordEncoder().encode("secret"))
            // 客户端可以访问的资源列表
            .resourceIds("res1")
            // 允许的授权类型
            .authorizedGrantTypes("authorization_code", "password",
                "client_credentials", "implicit", "refresh_token")
            // 允许的授权范围
            .scopes("all")
            // 自动授权, 如果是授权码模式, 且设置为false, 则会跳转到授权页面
            .autoApprove(false)
            // 授权成功后重定向地址, 授权成功后会在该地址后附带上授权码
            .redirectUris("http://127.0.0.1:80/token");
    }
}
配置令牌管理服务
@Configuration
@EnableAuthorizationServer
public class AuthorizationServerConfig extends AuthorizationServerConfigurerAdapter {
    @Autowired
    private TokenStore tokenStore;

    @Autowired
    private ClientDetailsService clientDetailsService;

    // 令牌管理服务配置
    @Bean
    public AuthorizationServerTokenServices tokenServices() {
        DefaultTokenServices services = new DefaultTokenServices();
        // 设置客户端信息服务
        services.setClientDetailsService(clientDetailsService);
        // 是否产生刷新令牌
        services.setSupportRefreshToken(true);
        // 令牌储存策略
        services.setTokenStore(tokenStore);
        // 令牌默认有效期2小时 2*60*60
        services.setAccessTokenValiditySeconds(7200);
        // 刷新令牌默认有效3天 3*24*60*60
        services.setRefreshTokenValiditySeconds(259200);
        return services;
    }

    // 令牌存储策略
    @Bean
    public TokenStore tokenStore() {
        // 内存方式, 生成普通令牌
        return new InMemoryTokenStore();
    }
}
令牌访问端点配置
@Configuration
@EnableAuthorizationServer
public class AuthorizationServerConfig extends AuthorizationServerConfigurerAdapter {
    @Autowired
    private AuthorizationCodeServices authorizationCodeServices;

    @Autowired  // 这个Bean应该是配置在SecurityConfig文件中
    private AuthenticationManager authenticationManager;

    // 设置授权码模式的授权码如何存取
    @Bean
    public AuthorizationCodeServices authorizationCodeServices() {
        return new InMemoryAuthorizationCodeServices();
    }

    // 令牌访问端点配置
    @Override
    public void configure(AuthorizationServerEndpointsConfigurer endpoints) throws Exception {
        endpoints.authenticationManager(authenticationManager)  // 密码模式需要
                .authorizationCodeServices(authorizationCodeServices)  // 授权码模式需要
                // 令牌管理服务
                .tokenServices(tokenServices())
                // 允许post提交
                .allowedTokenEndpointRequestMethods(HttpMethod.POST);
    }

    // 令牌访问端点安全策略
    @Override
    public void configure(AuthorizationServerSecurityConfigurer security) throws Exception {
        security.tokenKeyAccess("permitAll()")
                .checkTokenAccess("permitAll()")
                // 允许表单认证申请令牌
                .allowFormAuthenticationForClients();
    }
}
SecurityConfig中的配置
@Configuration
@EnableWebSecurity
public class SecurityConfig extends WebSecurityConfigurerAdapter {
    // 密码编码设置
    @Bean
    public PasswordEncoder passwordEncoder() {
        return new BCryptPasswordEncoder();
    }

    // 认证管理器
    @Bean
    public AuthenticationManager authenticationManagerBean() throws Exception {
        return super.authenticationManagerBean();
    }
}
授权相关的页面编写
申请授权的页面
<!-- /oauth/authorize 是默认请求授权链接 -->
<form class="pure-form pure-form-stacked" method="post" action="/oauth/authorize">
  <div class="pure-control-group">
    <label>client_id
      <input type="text" name="client_id" placeholder="client_id" required autofocus value="c1">
    </label>
  </div>

  <div class="pure-control-group">
    <label>response_type
      <input type="text" name="response_type" placeholder="response_type" required value="code">
    </label>
  </div>

  <div class="pure-control-group">
    <label>scope
      <input type="text" name="response_type" placeholder="response_type" required value="all">
    </label>
  </div>

  <div class="pure-controls">
    <button class="pure-button pure-button-primary" type="submit">获取授权</button>
  </div>
</form>
申请token的页面
<!-- /oauth/token 是默认申请令牌(access token)的链接 -->
<form class="pure-form pure-form-stacked" method="post" action="/oauth/token">
  <div class="pure-control-group">
    <label>client_id
      <input type="text" name="client_id" placeholder="client_id" required autofocus value="c1">
    </label>
  </div>

  <div class="pure-control-group">
    <label>client_secret
      <input type="text" name="client_secret" placeholder="client_secret" required value="secret">
    </label>
  </div>

  <div class="pure-control-group">
    <label>grant_type
      <input type="text" name="grant_type" placeholder="grant_type" required value="authorization_code">
    </label>
  </div>

  <div class="pure-control-group">
    <label>code
      <input type="text" name="code" placeholder="code" required th:value="${code!=null?code:''}">
    </label>
  </div>

  <div class="pure-controls">
    <button class="pure-button pure-button-primary" type="submit">获取令牌</button>
  </div>
</form>
最后在控制器中完善一点细节,那么一个简单的授权服务器就可以使用了
